1 - Introduction
 Getting around your device quickly and confidently is a key digital skill, whether you're searching for jobs, managing emails, or organising notes. This lesson covers the basics of navigation on desktop and mobile, so you can handle multiple apps without frustration.
- Move the pointer or use touch gestures to control your screen.
- Open and close apps safely from menus or icons.
- Switch between open apps using taskbars, docks, or recent apps screens.
- Understand home screens, app drawers, and basic multitasking.
- Try split screen for working with two apps at once.
- Complete practice tasks like noting job details while browsing.
2 - Key Concepts
Key Concepts
 Here are simple definitions for the main terms used in this lesson:
- App / Program: An app (short for application) or program is software you run on your device to do a task, like writing notes in Notepad or browsing the web in a browser.
- Pointer / Cursor: The small arrow or line on screen that shows where your mouse or finger input is pointing; it moves when you move the mouse or your finger on a touchpad.
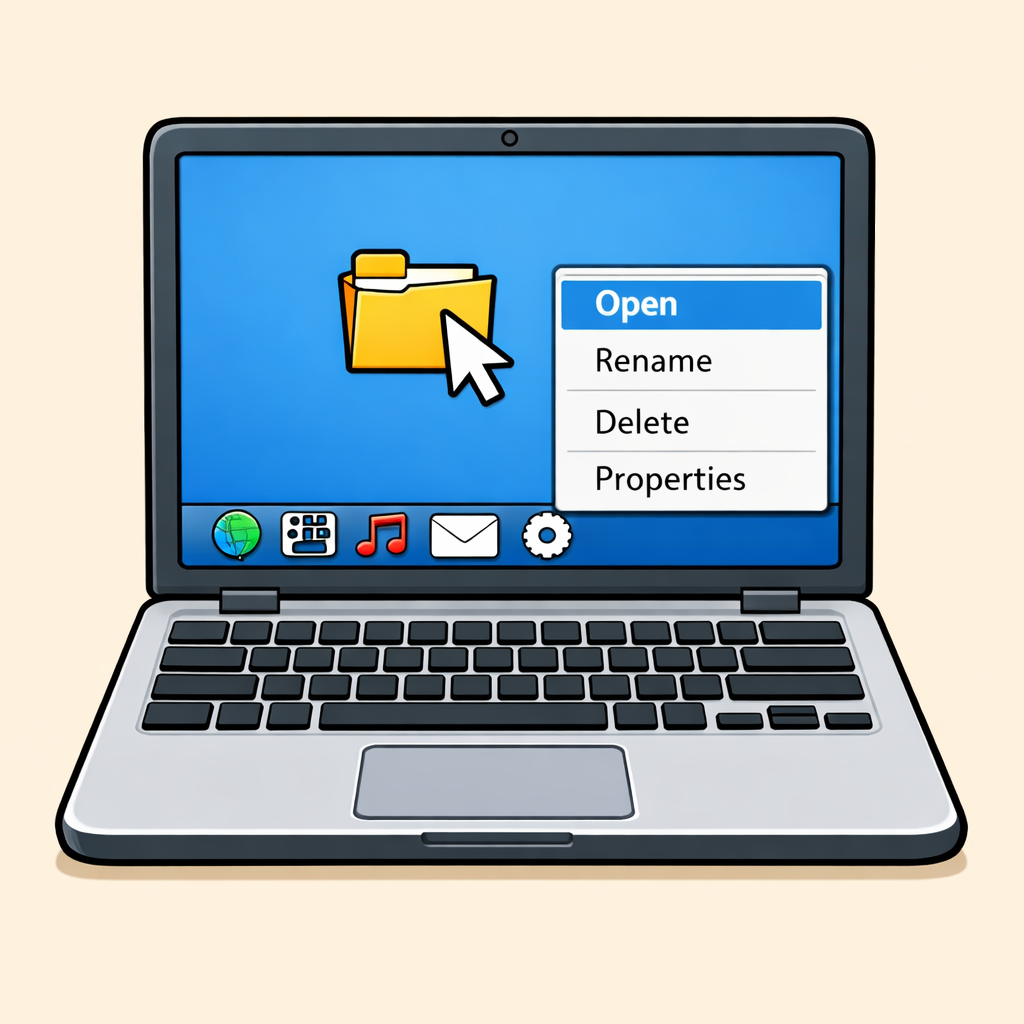
- Click vs Double-click vs Right-click: A single left-click selects an item; double-click (two quick left-clicks) opens it; right-click (or two-finger tap) opens a menu of options.
- Touchpad: The flat area below the keyboard on laptops that you slide your finger over to move the pointer, replacing a mouse.
- Gesture (tap, swipe, pinch, long-press): Touch actions like tap (quick touch to select), swipe (drag finger to scroll), pinch (fingers together to zoom out), or long-press (hold finger down for a menu).
- Taskbar (Windows) / Dock (Mac): A bar at the bottom of the screen showing pinned apps and open windows; click icons to switch or launch apps (dots show open ones on Mac).
- Home screen: The main screen you see when you start your device or return from an app, showing app icons for quick access.
- App drawer (Android) / App Library (iPhone): A full list of all installed apps; on Android, swipe up to open it, on iPhone swipe left to the end of home screens for alphabetical order.
- Multitasking (what it means in daily life): Running and switching between multiple apps at once, like keeping notes open while browsing job sites, or using split screen to view email and calendar together.
- Practice moving the pointer or using touch gestures first to build control before clicking or tapping.
- Use single-click or tap to select, double-click to open, and right-click or long-press for menus.
- Check the taskbar, Dock, or recent apps screen to switch between open apps quickly.
- Try split screen multitasking, like notes on one side and a browser on the other, for real tasks such as job searching.
3 - Windows Walkthrough
A) Windows (desktop/laptop)
Follow these steps on your Windows device. Do each one in order.
- Move the mouse: Move your mouse around.
The small arrow (pointer) moves on screen.
Your desktop background may look different. - Left-click once: Left-click once on the desktop.
The pointer responds, but nothing major happens.
If no response: Click slower. - Double-click: Double-click (two quick left-clicks) on a blank desktop spot.
If icons or folders are there, one may open. - Right-click: Right-click on the desktop.
A menu appears with options like 'New' and 'Display settings'. - Touchpad (if on laptop): Place one finger on the touchpad and move.
The pointer follows your finger.
Use two fingers to scroll in any open window. - Open Start menu: Click the Start button (Windows icon, bottom-left of taskbar).
The Start menu opens. - Launch an app from Start: Click an app like Notepad or Edge in the Start menu.
The app opens in a window.
If not listed: Search for 'Notepad' in the Start search bar. - Use taskbar icons: Click a pinned app icon on the taskbar (bottom of screen).
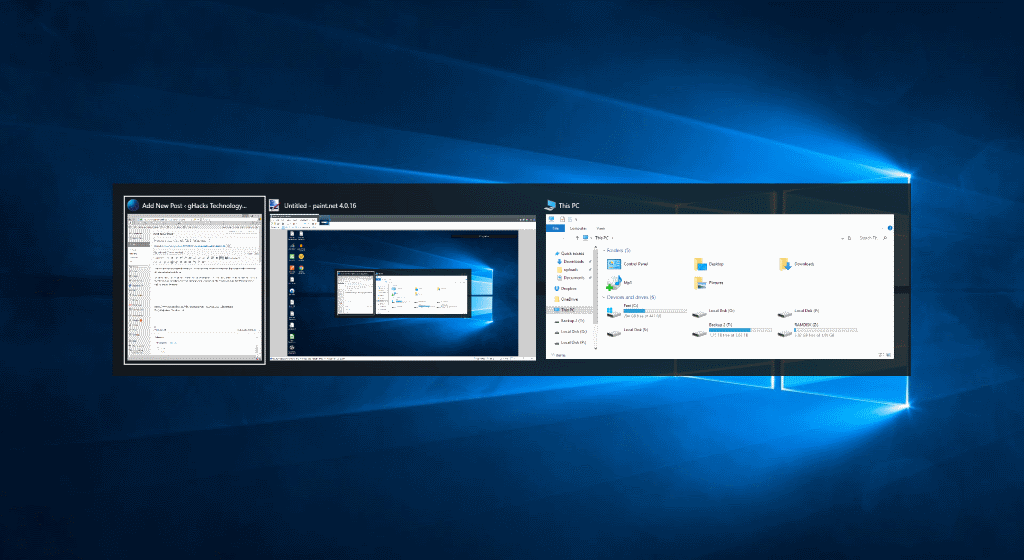
The app opens or switches to it. - Open multiple apps: Open two apps, e.g. Notepad and Edge.
Taskbar shows icons for both. Click them to switch between apps. - Switch with Alt+Tab: Press and hold Alt + Tab.
A preview of open apps appears. Release keys on the app you want. - Close an app: Click the X button in the top-right corner of the app window.
The window closes safely. - Split screen multitasking: Drag an app window to the left edge of the screen until it snaps into place.
Then drag a second app to the right edge.
Now both apps share the screen side-by-side.
Shortcut: Hold Windows key + arrow keys. - Exit split screen: Drag the title bar of a window or click the 'Restore' button to return to normal size.


4 - Mac Walkthrough
B) Mac (desktop/laptop)
Follow these steps on your Mac device. Do each one in order.
- Move the mouse: Move your mouse or finger on the trackpad.
The pointer moves on screen.
Your desktop background may look different. - Click once: Click (tap trackpad or left mouse).
Items respond to selection.
If no response: Click slower. - Two-finger scroll: Two-finger scroll on trackpad in a window.
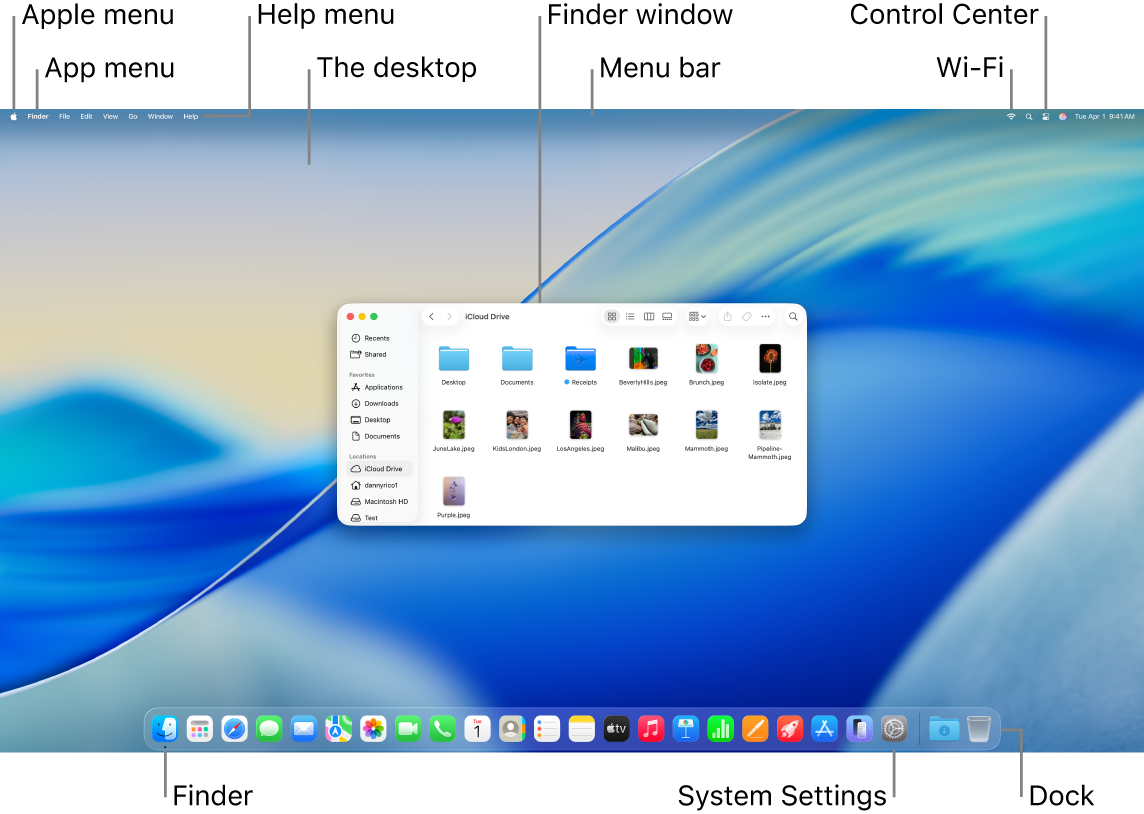
Content scrolls up/down. - Open Launchpad: Click Launchpad icon in Dock (rocket icon).
App grid opens. - Launch an app from Launchpad: Click an app like Notes from Launchpad.
It opens.
If not listed: Use Spotlight search (magnifying glass or Cmd+Space). - Use Dock icons: Click a Dock icon (e.g., Safari).
App opens or switches.
If it looks different: Apps may have a dot underneath when open. - Open multiple apps: Open two apps, e.g. Notes and Safari.
Dock shows dot under open ones; click to switch. - Switch with Command+Tab: Press and hold Command + Tab.
App switcher shows; hold Command, Tab to next. Release on the app you want. - Close a window: Click the red button top-left.
Window closes (app may still run). - Quit an app: Press Command + Q.
The app closes fully. - Split screen multitasking: Hover over green button on a Mac app window, choose Move to Left/Right.
Or drag windows side-by-side.
If iPad-like: Use Split View. - Exit split screen: Click full screen button, drag the divider to the edge, or click green button to exit split.

5 - Android Walkthrough
Follow these steps on your Android phone or tablet. Do each one in order.
-
Tap the screen: Tap once on an app, button, or menu item.
The item opens or highlights.
If nothing happens: Tap once firmly and wait a second. -
Swipe to move around: Place one finger on the screen and slide up, down, left, or right.
This lets you scroll through pages or move between home screens. -
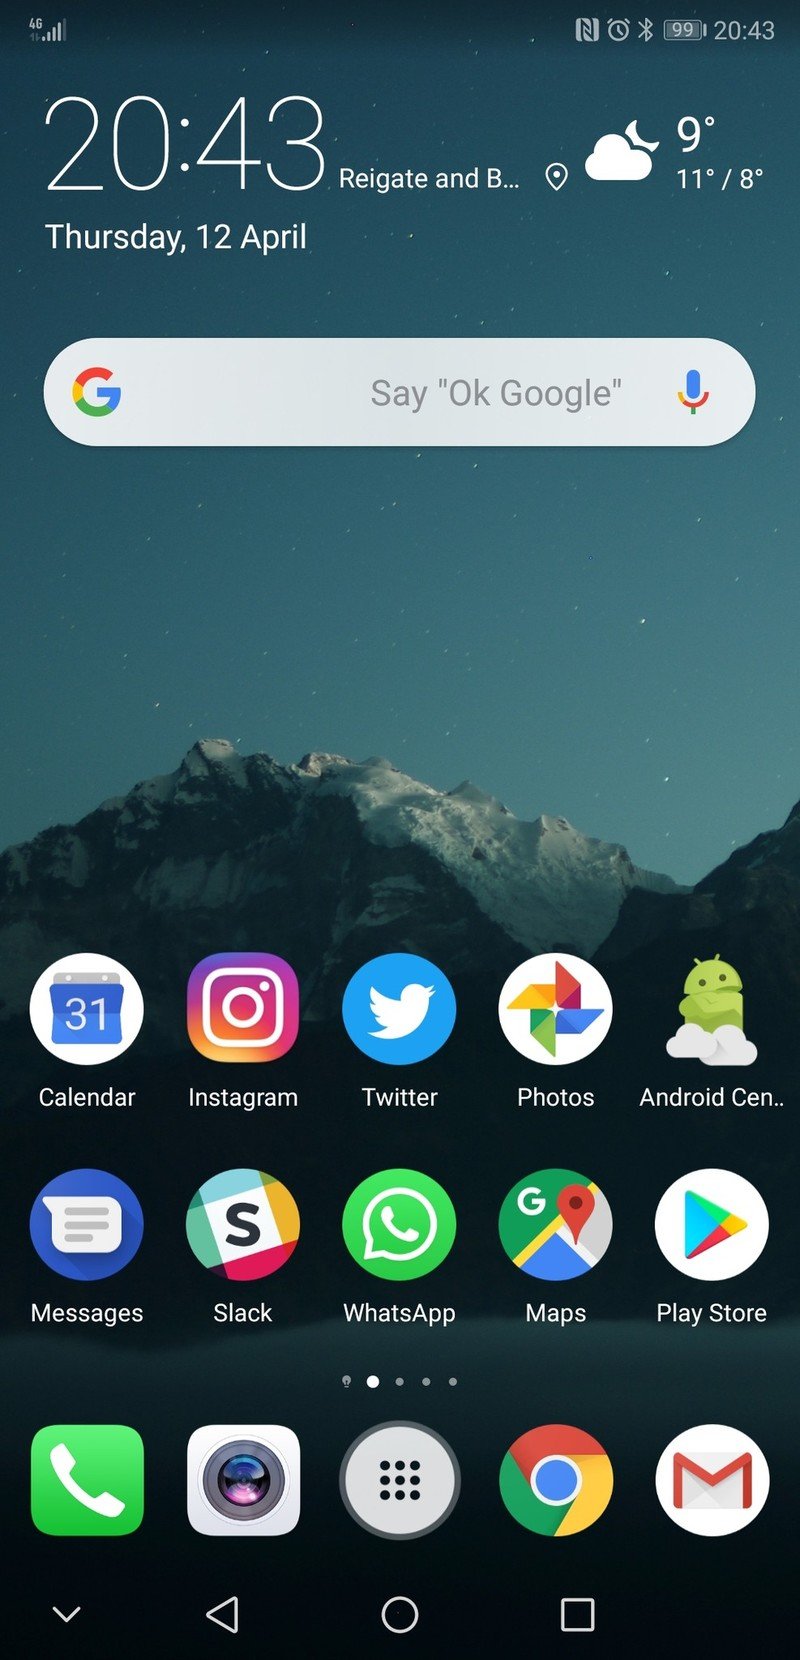
Go to the Home screen: Use the Home button or Home gesture.
On many Android phones, swipe up from the bottom edge of the screen.
On some phones, tap the Home button instead. -
Open the app drawer: From the Home screen, swipe up from the bottom to see all installed apps.
A full list or grid of apps appears. -
Open an app: Tap an app such as Settings, Camera, or Chrome.
The app opens on screen. -
Go back: To return to the previous screen, use the Back button or Back gesture.
On gesture-based phones, swipe inward from the left or right edge.
On button-based phones, tap the Back button. -
Use Recent Apps: Swipe up and hold from the bottom, or tap the Recent Apps button.
Your open apps appear as previews.
Tap one to switch between apps. -
Open notifications and settings: Swipe down from the top of the screen.
Notifications appear.
Swipe down again on many phones to see quick settings like Wi-Fi, Bluetooth, and brightness.

Unlock the full learning experience
You're previewing this lesson. Get full access to this lesson and hundreds more — each one ready to teach, with interactive activities, printable resources and pupil progress tracking built in.
This lesson is copyright of Coding Ireland 2017 - 2025. Unauthorised use, copying or distribution is not allowed.