We have already learned about HTML, which is a coding language to create the structure and content of web pages.
CSS stands for Cascading Style Sheets and is a programming language for styling the content of web pages. CSS applies styles to HTML elements and can change how they look on the web page.
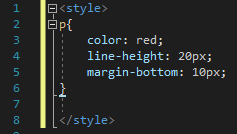
For example we could use the following CSS code to define how all paragraphs on a website appear:
p{
    color: red;
    line-height: 20px;
    margin-bottom: 10px;
}
So anywhere we use a <p></p> tag in the HTML code, the text will:
We call the CSS that we write rules. We can write a CSS rule for paragraphs of text, for images, for tables etc. A CSS rule has a selector and a declaration block.
The selector is the HTML element you want to create the rule for and the declaration block has the style rules for that HTML element.
h2{
    color: green;
    font-size: 18px;
    text-align: center;
}
In the above CSS code the selector is the h2 element and there are 3 rules specified in the declaration block. These rules are contained inside curly braces {} and each rule has the CSS property name (e.g. color) and the value that should be applied (e.g. green). The property and the value is separated with a semicolon :
Take a look at the below HTML and CSS code and notice how it creates a CSS rule for the h2 element and that the rule gets applied to each of the <h2></h2> tags.
xxxxxxxxxx<h1>Player Profile</h1><h2>Name</h2><p>Kyrie Irving</p><h2>Team</h2><p>Brooklyn Nets</p><h2>Position</h2><p>Point guard</p>xxxxxxxxxxh2 { color: green; font-size: 18px; text-align: center;}As mentioned above, the CSS selector is the HTML element that you want to create the rule for. There are different ways that we can select which HTML elements to apply the rule to.
Element Selector
As in the above examples we can select a HTML element to apply the rule to.
p{
    color: blue;
}xxxxxxxxxx<h1>Player Profile</h1><h2>Name</h2><p>Kyrie Irving</p><h2>Team</h2><p>Brooklyn Nets</p><h2>Position</h2><p>Point guard</p>xxxxxxxxxxp{ color: blue;}In HTML we can give a HTML tag an id attribute and then we can use that ID as the selector for a CSS rule. IDs have to be unique within a web page which means that you can't use the same ID more than once. To create a CSS rule for an ID we put a hash # in front of the ID.
#namepara{
    color: red;
}xxxxxxxxxx<h1>Player Profile</h1><h2>Name</h2><p id="namepara">Kyrie Irving</p><h2>Team</h2><p>Brooklyn Nets</p><h2>Position</h2><p>Point guard</p>xxxxxxxxxx#namepara{ color: red;}In HTML we can give a HTML tag a class attribute and then we can use that class as the selector for a CSS rule. Unlike IDs, the same class can be used many times for different HTML elements in a web page. To create a CSS rule for a class we put a period . in front of the class.
.details{
    color: green;
}xxxxxxxxxx<h1>Player Profile</h1><h2>Name</h2><p class="details">Kyrie Irving</p><h2>Team</h2><p class="details">Brooklyn Nets</p><h2>Position</h2><p>Point guard</p>xxxxxxxxxx.details{ color: green;}We can give a HTML element multiple classes like in the following example.
xxxxxxxxxx<h1>Player Profile</h1><h2>Name</h2><p class="red big">Kyrie Irving</p><h2>Team</h2><p class="green small">Brooklyn Nets</p><h2>Position</h2><p class="green big">Point guard</p>xxxxxxxxxx.red{ color: red;}.green{ color: green;}.big{ font-size: 20px;}.small{ font-size: 10px;}