Welcome to our exciting project! We're going to use a special tool called a microbit. This is a tiny computer that we can program to do lots of cool things. One of the cool things it can do is sense how much light is around it. Just like how our eyes can tell if it's bright or dark, the microbit can do the same!
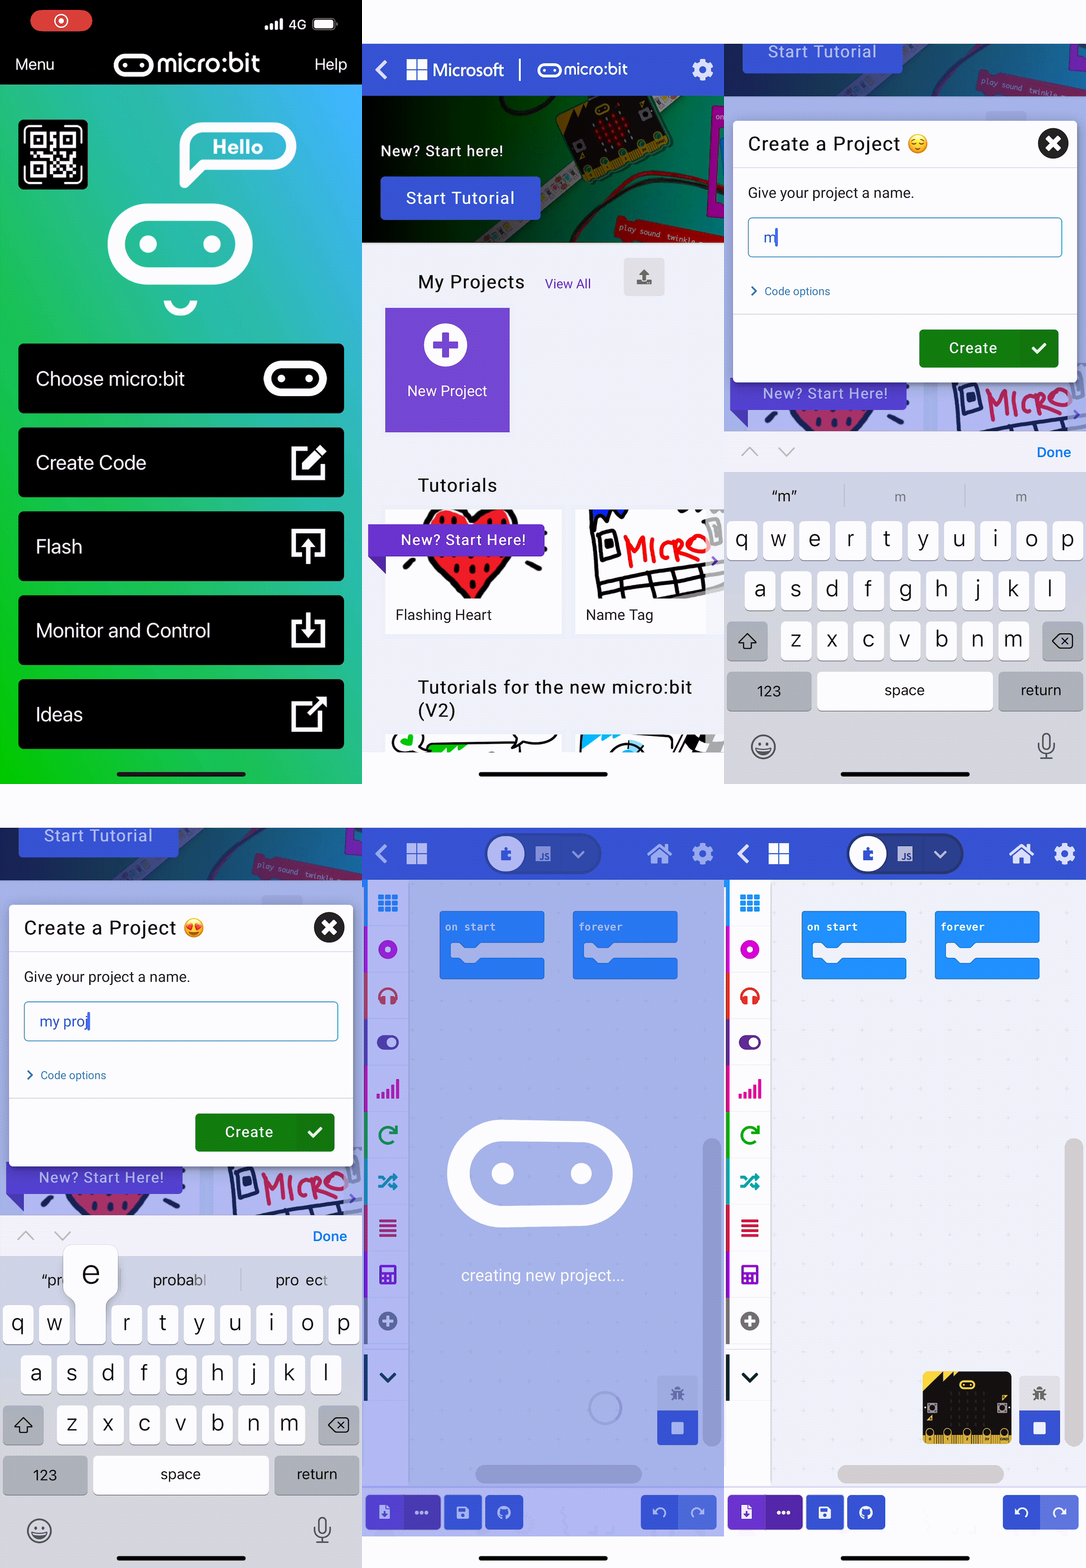
First, we need to set up our microbit. Go to the MakeCode Microbit Editor and start a new project. This is where we'll write our code to tell the microbit what to do.
Don't worry if you've never done this before, we'll guide you through each step. Remember, coding is like giving instructions to the computer. So, we're going to tell the microbit to look at the light and tell us how bright it is. Let's get started!
Go to the Makecode.com Microbit website using the link below and click on the 'New Project' button underneath the 'My Projects' heading.
https://makecode.microbit.org/
Install the micro:bit app on your iPad or tablet.
Open the app, tap 'Create code' and then create a new project.

First, we need to tell our microbit that we're going to be measuring light. To do this, we're going to make a special container (called a 'variable') where we can keep our light measurements. We're going to name this container 'light' and to start with, we're going to put the number 0 in it.
This is like telling our microbit, 'Hey, we're going to start measuring light now, but right at this moment, we're not measuring anything yet, so just hold onto this number 0 for us.'
Here's how you tell your microbit to do this:
let light = 0
This is like saying 'Let there be a container called 'light', and for now, put the number 0 in it.'
Now, let's make our microbit smart enough to keep checking the light level around your plant. We'll do this by using a special block of code called 'forever'. This block will keep repeating whatever we put inside it. In our case, it will keep checking the light level.
Next, we need to remember the light level that our microbit sees. For this, we'll use something called a 'variable'. You can think of a variable as a small box where we can store information. We'll name our variable 'light' and store the light level in it.
Here's the code to do this:
{basic.forever(function() {let light = input.lightLevel()})}This code means: 'Forever, keep checking the light level and remember it in the 'light' box.'
In this step, you will program your microbit to display the light level it measures. This number tells us how much light your plant is getting. We'll use a 'show number' block to display this information. We'll put this block inside a 'forever' block, which means your microbit will keep updating and showing the light level continuously.
Add the following code:
basic.forever(function() {let light = input.lightLevel(); basic.showNumber(light);})This code does two things: First, it measures the light level and saves it as 'light'. Second, it shows the 'light' number on your microbit's LED screen. The 'forever' part means it keeps doing these two things over and over again.
Once you've added this code, you can test it out on your virtual microbit. The virtual microbit is a digital version of the physical microbit that you can use to test your code. You'll see it on the screen when you're coding. When you run your code, the virtual microbit will show the light level just like a real microbit would. This is a great way to see if your code is working correctly before you use it with a real microbit and a real plant.
Now that we have our light level, let's make it more fun and easy to understand. We are going to display the light level as a bar graph on your microbit. A bar graph is a chart that uses bars to show comparisons between categories of data. In our case, the categories are different light levels and the bars will show how much light there is.
Add the following code:
let light = 0
basic.forever(function () {
    light = input.lightLevel()
    led.plotBarGraph(
    light,
    255
    )
})
In this code, we are using the 'led.plotBarGraph' function. This function needs two numbers: the first one is the value you want to show (in our case, the light level), and the second one is the biggest possible value (in our case, 255, which is the highest light level that the microbit can see). The microbit will then show a bar graph on its LEDs where the length of the bar represents the light level. Think of it like a race, where the light level is the runner and 255 is the finish line. The more light there is, the closer the runner is to the finish line!


